Abstract
The rather new 8Bit RISC microprocessors from ATMEL ATtiny4, ATtiny5, ATtiny9 and ATtiny10 are attractive, thanks to their very small size, their very low power consumption and their very low price. They are in fact so small and cheap, that they can easily replace glue logic made from transistors in many applications. But despite their rather limited size of flash memory and RAM, they make very nice processors for more complex applications as well. This article describes how to work with them in a Linux environment (tested on Linux Mint 17).
Assembly programming
I have tested successfully to run the ATMEL development environment AVR Studio 4.18 SP3 in Wine 1.6.2. The newer versions AVR Studio 5.x and 6.x are really big .net calipers, that don’t seem to run in Wine. There is a Version 4.19 but that is said to be buggy.
I have written some test programs in assembly language within AVR Studio and that worked fine. Also the line by line simulation in AVR Studio worked flawlessly.
The only minor inconvenience that I found was that working with tabs rather than spaces in the AVR Studio editor led to problems with the displayed source code. The code itself was not damaged, but it was erroneously displayed which lead to irritations.
AVR Studio can be downloaded from the ATMEL Webpage. You need to register first, to get a download link. Download and install AVR Studio 4.18 first, then download and add the Service Pack 3 installation.
Programming in C with avr-gcc
When the ATtiny devices came to the market, they were widely considered “brain dead”, as they had so little flash memory and RAM, and the tool-chain was not really great then. Today it works really well to program them in C, using the well known gcc C-Compiler in the avr-gcc version.
I have tried out how much programming complexity can fit into the available 512Bytes of flash memory on the ATtiny4 (The ATtiny9 and ATtiny10 have 1024Bytes). It was quite impressing to see that the mathematical library for the division of two “long int” variables actually fits in, see source code below. Only “float” operations are apparently not supported by the avr-gcc compiler, when the ATtiny devices are selected. It works fine for larger AVR devices.
The avr-gcc can be installed from the repositories in Ubuntu based Linux distributions, but unfortunately this version does not support the ATtiny devices, as of today. But that is not a problem, as a well working version with ATtiny support can be downloaded from the ATMEL homepage. Simply extract the downloaded archive into any convenient folder on your LInux machine, there is no further kind of installation required. You only need to add the path to that folder in your makefile, which is further explained below.
Write your program in your preferred Linux editor (personally I like Geany, but there are many other good editors around).
Here is an example for a ATtiny program written in C. It contains the division of long int variables, which is probably not a very typical use case. But it also shows how to access the GPIO pins and how to use the delay function.
Setting up the compile environment
The next step is to create (or adapt) a makefile for the compile process. This is really the key part. If your makefile is good, compiling is easy and even flashing the software into the device hardware can be triggered via the make process. I am using the makefile below, that I have used many years ago already, and now I updated it and did some cleanup.
Where it says CC= …, simply fill in the path to where you extracted the avr-gcc that you downloaded from the ATMEL homepage. Then change the TARGET=… entry to the name of your .c sourcefile, without the .c extension. If you would like to compile for a different device than the ATtiny4, change the MCU=… entry accordingly. All other entries are probably fine for you as they are.
To start the compile process, just open a terminal window, go to the folder where your source code and your makefile is located and type “make”. That will produce a number of files with different extensions, one of them is the .hex file, that you need to flash to your device.
If you want to use the make process also to flash your binary file into the ATtiny4, you may have to adapt the programmer that you use and the interface to your PC in the makefile. But let’s look into the hardware configuration for the flash process first.
Flashing the binary code to the hardware
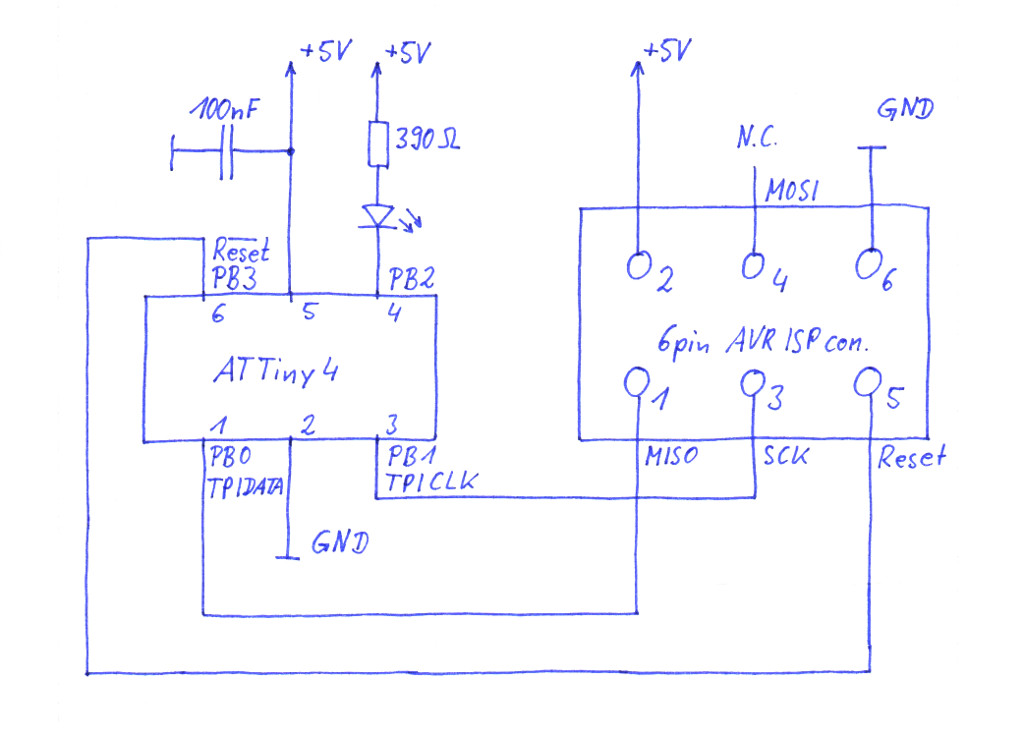
The ATtiny4 and it’s brothers use a different communication interface than the more commonly known AVR processors. There are no MOSI, MISO and SCK lines any more. The new signals are called TPIDATA and TPICLK. So it is actually one line less now, thanks to TPIDATA being a bidirectional signal line. In practice all this does not change a lot. If you use the ATMEL AVRispmkII programmer, it will be able to handle these signal as well, mapped to the traditional 6pin connector. Connect the lines as shown below in the picture (you may want to skip the LED on pin4 of the device, that is just for testing the software later on). Even though the programmer is powered via USB from your PC, it is needed to connect pin2 of the 6pin connector to +5V on your device circuit board, for the flash process to work.
Also it is important to really run the circuit on +5V during the flash process. Once programmed, the device will work down to 1.8V officially, I have seen it working even down to 1.28V. But the flash process requires a higher voltage, otherwise it will fail, which will be indicated during the verify sequence. I have tested it and found 3.7V the minimum voltage for the flashing, but the data sheet requires +5V.
On the software side I use avrdude, which can be installed from the repositories on Ubuntu based distributions. Once you have it installed, simply go to your working directory, where .hex file was created by the compiler, and type:
sudo avrdude -P usb -c avrispmkII -p ATtiny4 -U math_on_tiny4.hex
If everything goes well, you device should be flashed within a few seconds.
Running the flash process without root privileges
As you can see above, the flashing command requires root privileges to access the USB interface. So you either need to precede it by “sudo”, or you define an udev rule for the programmer. The latter is of course preferable from a security point of view. To do so, go to /etc/udev/rules.d and create a file with the following content.
# Atmel AVR ISP mkII
SUBSYSTEM==”usb”, ATTRS{idVendor}==”03eb”, ATTRS{idProduct}==”2104″, GROUP=”dialout”, MODE=”0660″
This allows all members of the group dialout to access the programmer. If your user account is not yet a member of the group dialout, just add it.
sudo usermod -aG dialout YOUR_USERNAME
Unplug the programmer and restart the udev service.
sudo service udev restart
Plug in the programmer, now it should work without sudo.
Flashing the device using the make process
If your makefile is configured correctly for the programmer that you use, you can trigger the flash process via make. Simply type
make program
to start the flashing. The same topic on root privileges applies as explained above.
Summary
If you know how it is done, it is fairly simple to work with these dwarf processors and I think it is a lot of fun. If you should stumble across any difficulties that lets you believe my instructions are erroneous or incomplete, please let me know. You find my E-Mail on my main page.